
I have been teaching CapCut to students on a range of courses and put together this reminder guide for them. I thought I’d share in case others found it useful.
The CapCut Homescreen
This is the CapCut homescreen – which most importantly displays your projects (if you have any!)
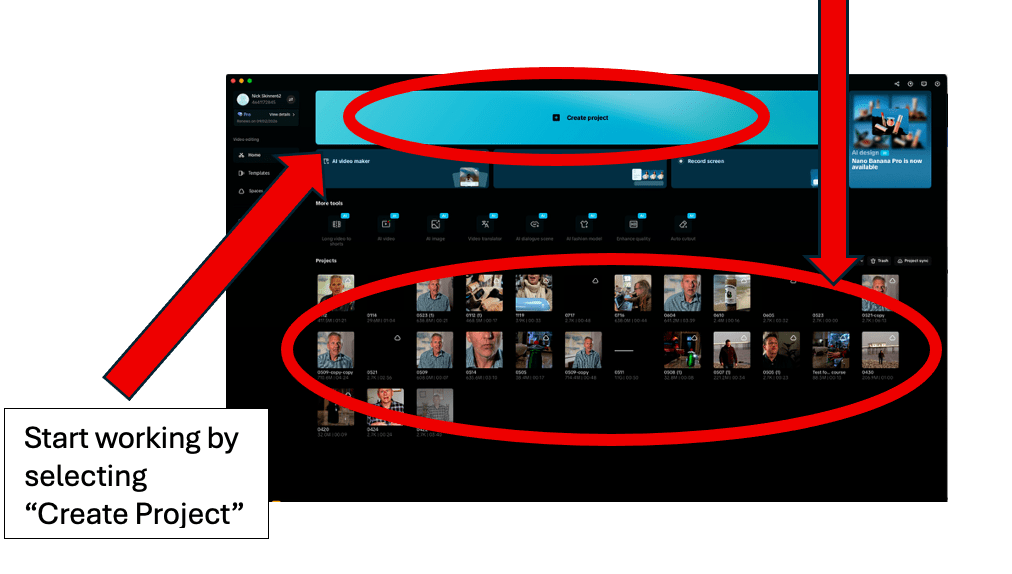
Unlike many other edit packages, you can only have one “timeline” in each “project”. So when you want to re-version your work, you need to duplicate the whole project.

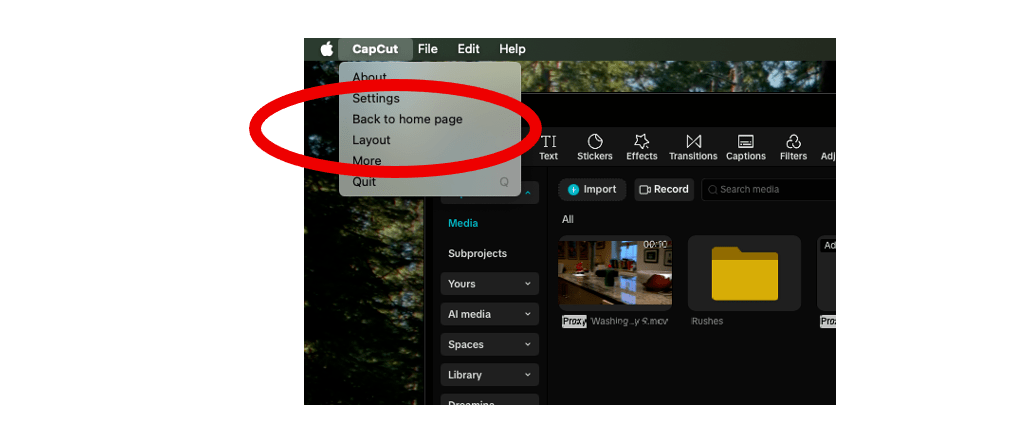
When you are working on a project, you can always get back to home through the CapCut dropdown menu on a Mac, or simply the “Menu” tab on a PC. (displayed on a Mac below).
1) Get Started by uploading media
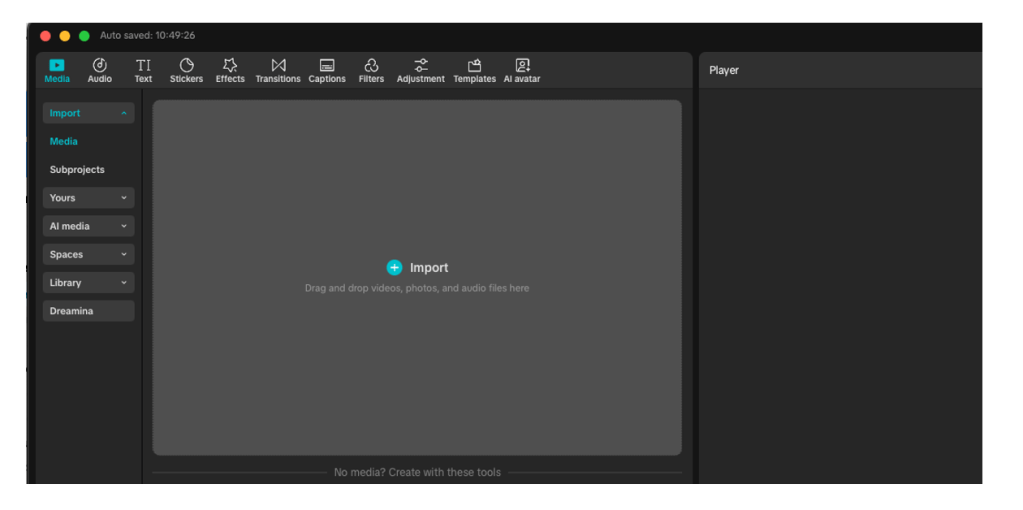
- Drag and drop or add files or folders from your laptop
- If you select a folder, all subfolders will be added too.
- You can “right click” to create more folders to keep organised and add media to them. Right click on a folder to rename and keep organised.
NOTE:
- Navigating through the folder tree is done through the very small text folder tree above the media window.
- Note also the blue “Import” button just above the folder tree. Press that to import more media.

2) Finding your way around
Start by dragging some media onto the timeline – located below the media window at the bottom of the screen.
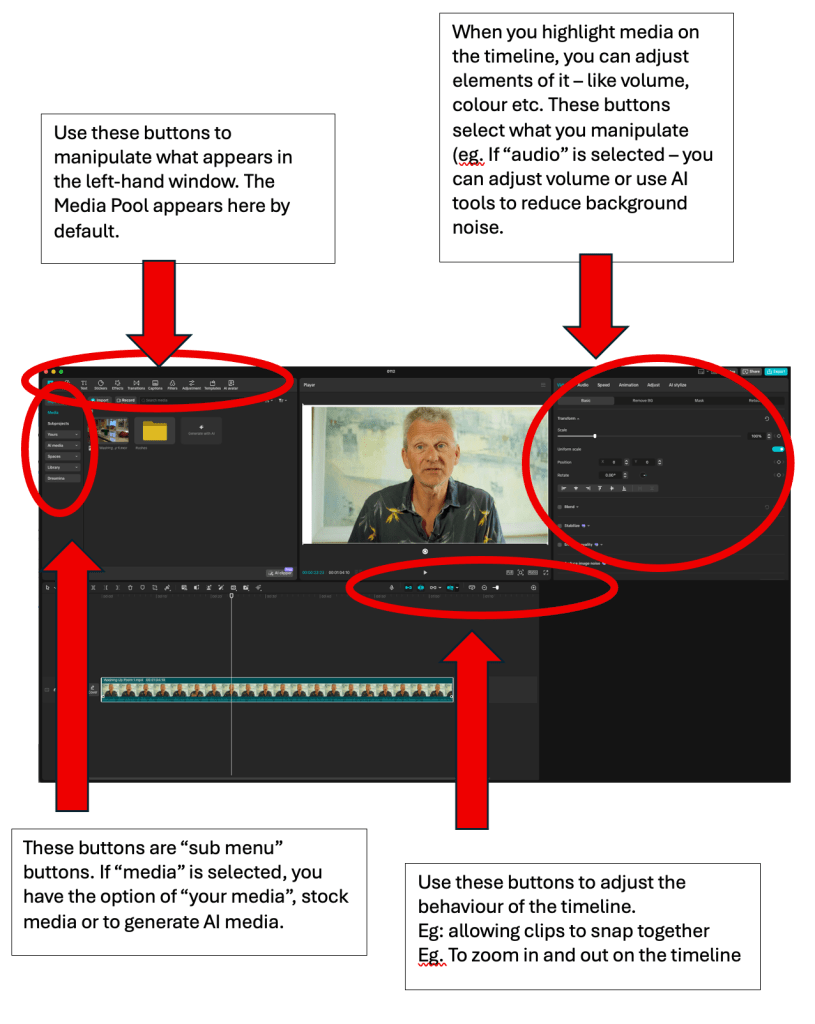
3) Settings on the Timeline
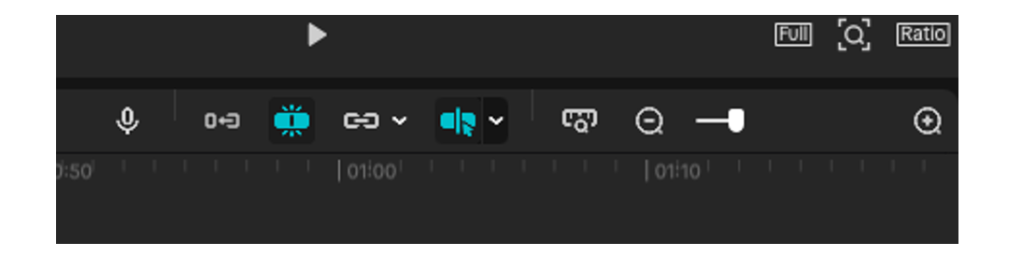
These buttons on the top right corner of the “timeline” window help you control how media works in the timeline. They are listed here from left to right. The key functions are in black.
- Voiceover record – attach your mic and go!
- Turn on / off base track snapping. If turned off, it means you can open gaps in the Video 1 track. Nice for professional pacing. When turned on – you are guaranteed no “black holes”.
- Snapping – like a magnet which pulls bits of media together on the timeline. It helps you line bits of media up with each other avoiding overlaps or gaps.
- Linkage – allows you to link effects to the base timeline so they stick together when you move the base timeline
- “Turn Off Preview Access” – gets rid of the yellow preview line.
- “Zoom to Fit” A shortcut to put your whole timeline on the timeline screen at once
- Zoom slider – zoom in and out of your timeline. Zooming in helps focus on detail in the timeline. Zooming out lets you see your whole story.
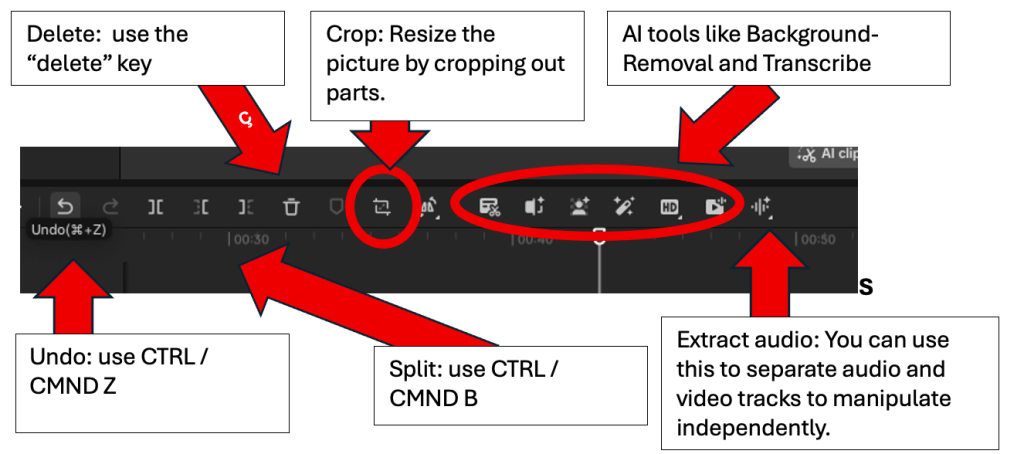
4) Editing on the timeline
These buttons on the top left of the timeline are key editing tools.
Mostly – use shortcuts! (hover over an icon to remind yourself of the shortcut). Many of the functions here are self-explanatory.
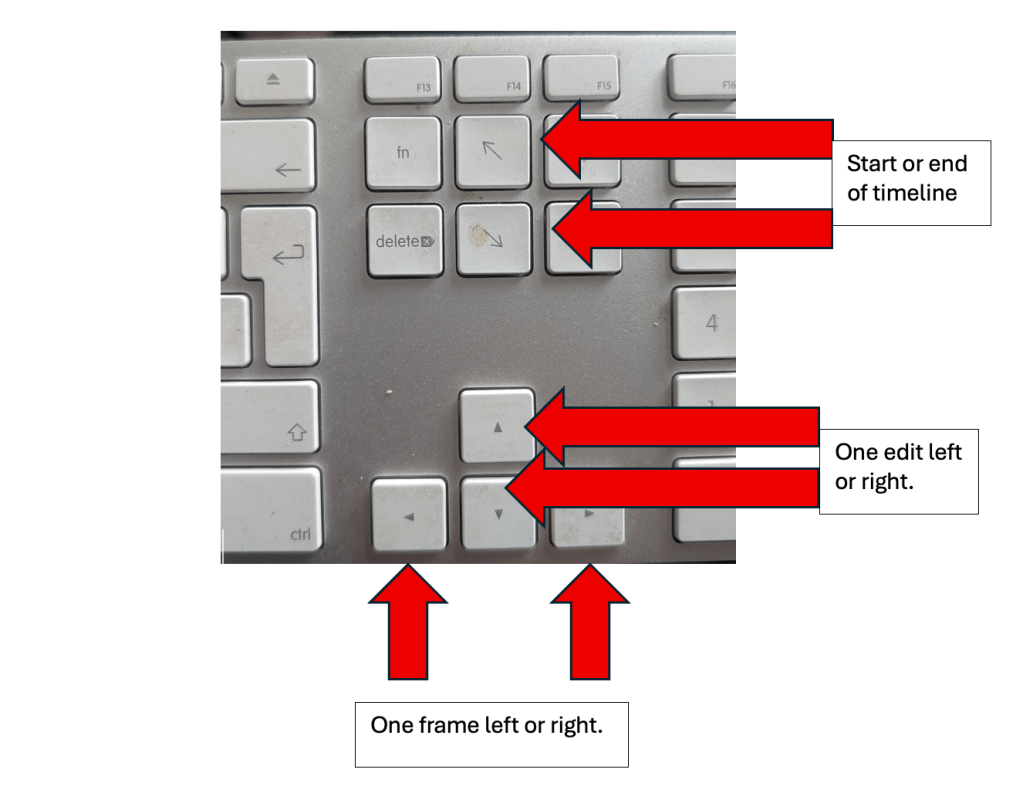
5. Keyboard navigation (depending on Keyboard)
6. CapCut Running slow? Quick Fix.
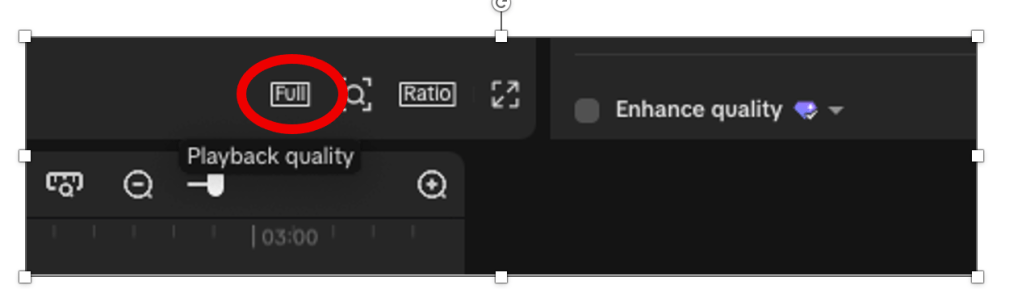
Selecting the button labeled “Full” (by default) will allow you to reduce the playback resolution of your media. This will speed up work on a slow computer (especially when using high-res video). This button is underneath the media display window.
You can also go to “Settings” and under the performance tab, tick the blue box marked “proxies”. Your computer will work in the background to create smaller files that it can handle more easily.
Using these steps might make your video look a bit less sharp in CapCut, but the final exported video will be the same!
7 Keyframing – adjusting volume and effects
Clicking on media in the timeline gives you a variety of options in the top right hand window.
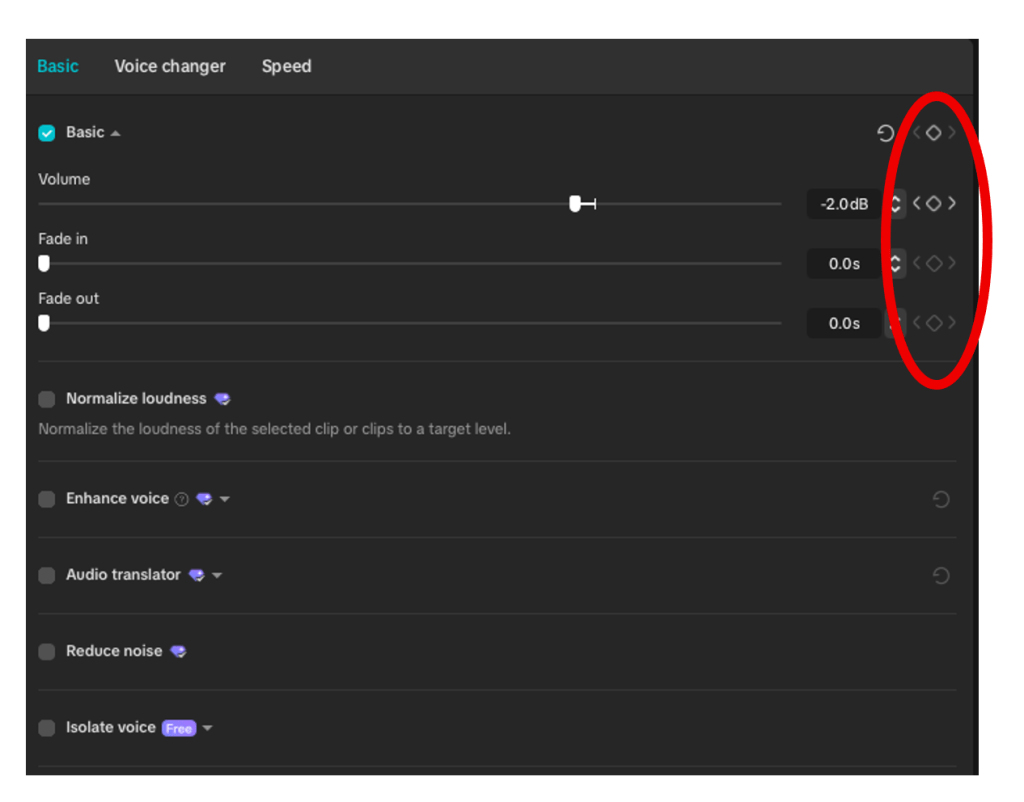
The small diamond icons beside commands in the RH window, are “keyframes”.
They can be used in lots of effects and are very useful in manually adjusting music levels.
- Highlight a clip – audio or video
- Select the effect you want to manipulate (in this case “volume”)
- Find the point you want to start the transformation. Add a keyframe by clicking on the diamond next to the effect
- Move to where the effect should end. Add another keyframe, then adjust the level of the effect.
- You can add as many keyframes as you like. Raising and lowering the level of any effect. (eg raising or lowering volume around gaps in speech)
In this case, I would add a keyframe just before my interviewee / actor started talking. I would move the cursor 3-4 frames, until just after they started talking, and then add another keyframe. I would then cut the volume to a level where the voice could be heard over the music. (usually between -15db- and -25db). At the end of the clip, I would do the same thing in reverse order – returning the music volume to 0.
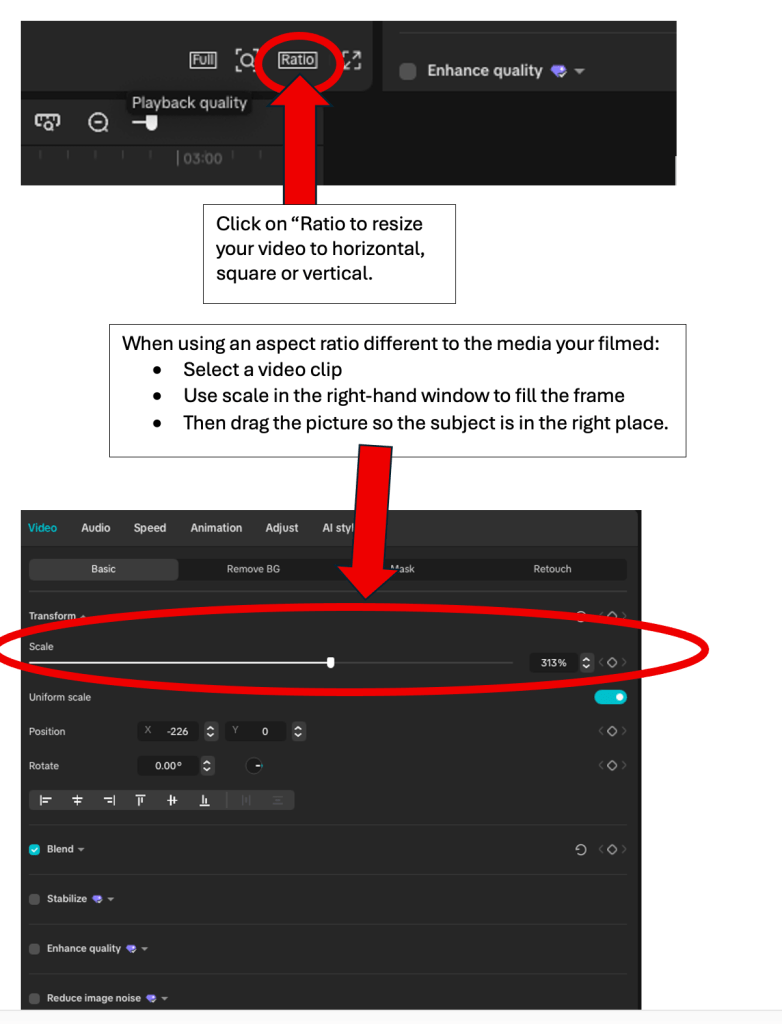
8. Change Video Size (Aspect Ratio)
9. Captions (aka Subtitles!)
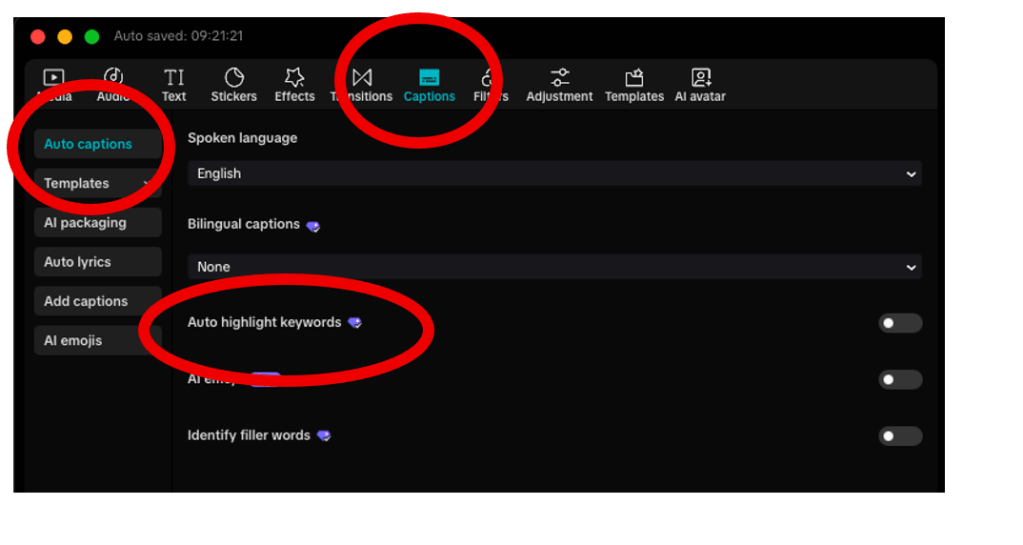
In the top LH window – select Captions from the menu along the top.
Auto option:
Select “Auto Captions” from the LH menu.
I suggest you deselect all the AI options – particularly “Auto Highlight Keywords”
You can then go in and manually correct any mistakes. (Don’t worry too much about capitalisation at this stage.)
Manual Option
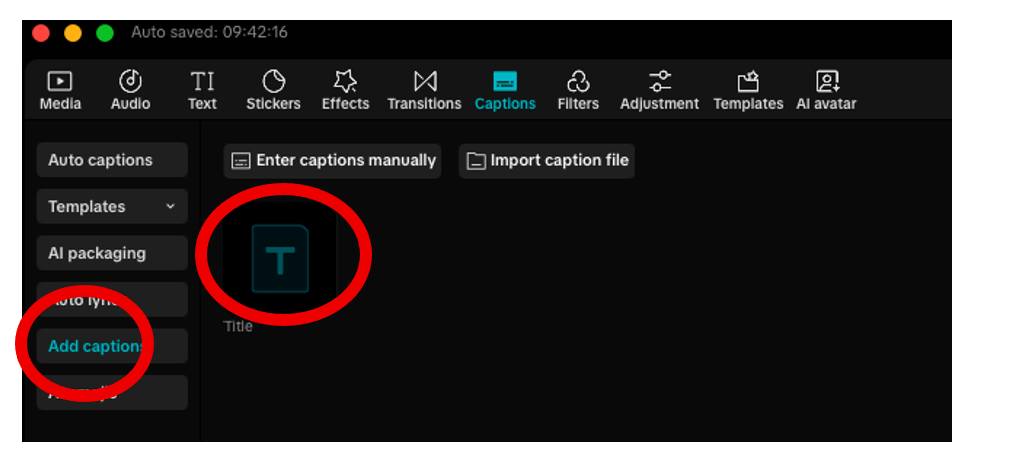
Now drag and drop the box marked “T” onto the timeline and edit like any other text layer.
Captions: The fun bit
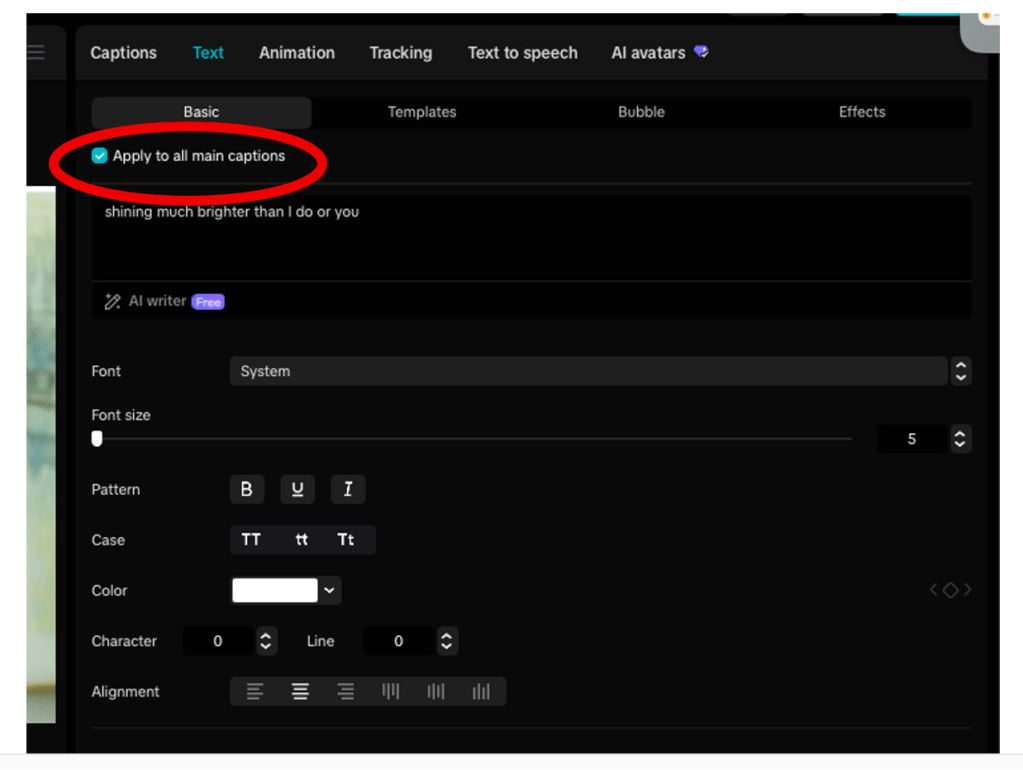
When a subtitle is selected in the timeline, go to the RH window.
Ensure “Apply to all main captions” is selected so that you are working on all your subtitles at the same time..
In the “Basic” tab you can adjust the font, font size, add background and much more. NOTE: A black background with (at least) 50% opacity has been recommended by charities who want to ensure accessibility.
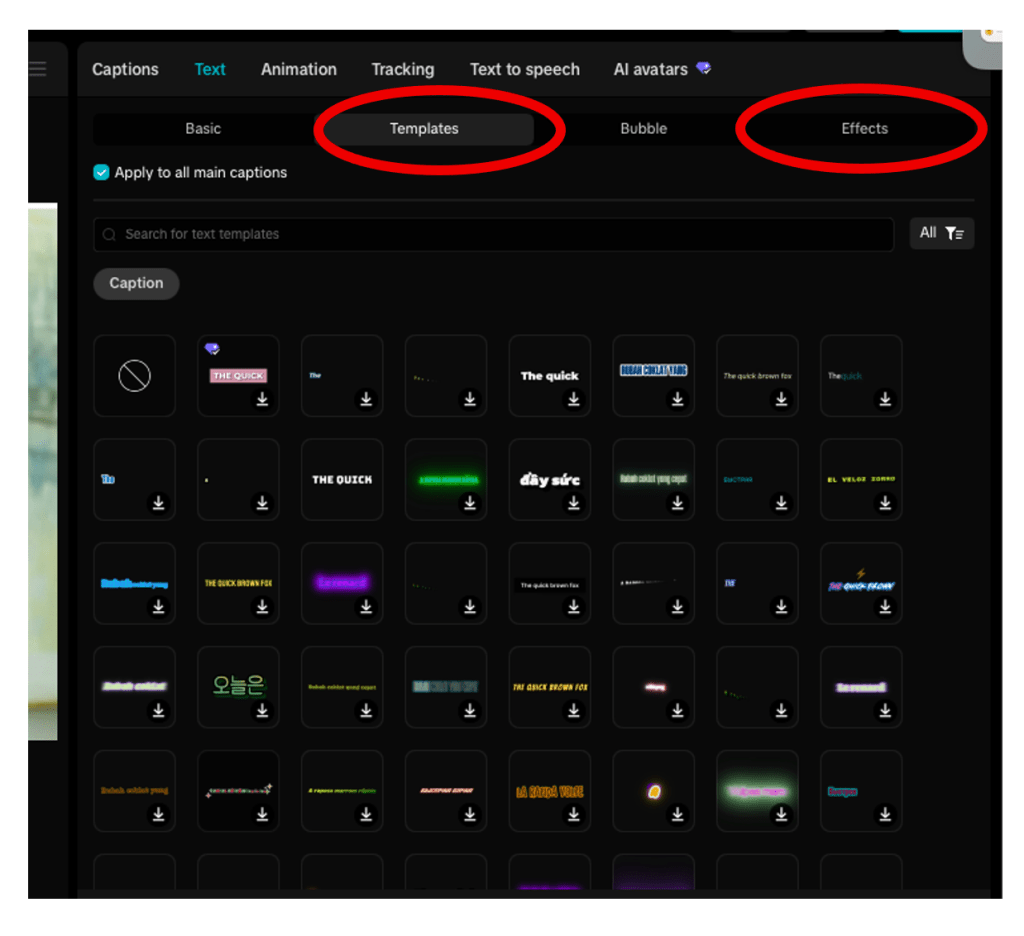
You can also experiment with preset text “styles” here.
Next – go to “Templates” (this only seems to work for auto-captions)
Select your subtitles on the timeline.
Click on the template you want.
Now you understand why everyone loves Capcut!
You can also go to “effects” (works on all captions) to jazz up your text. Select your subtitles on the timeline.
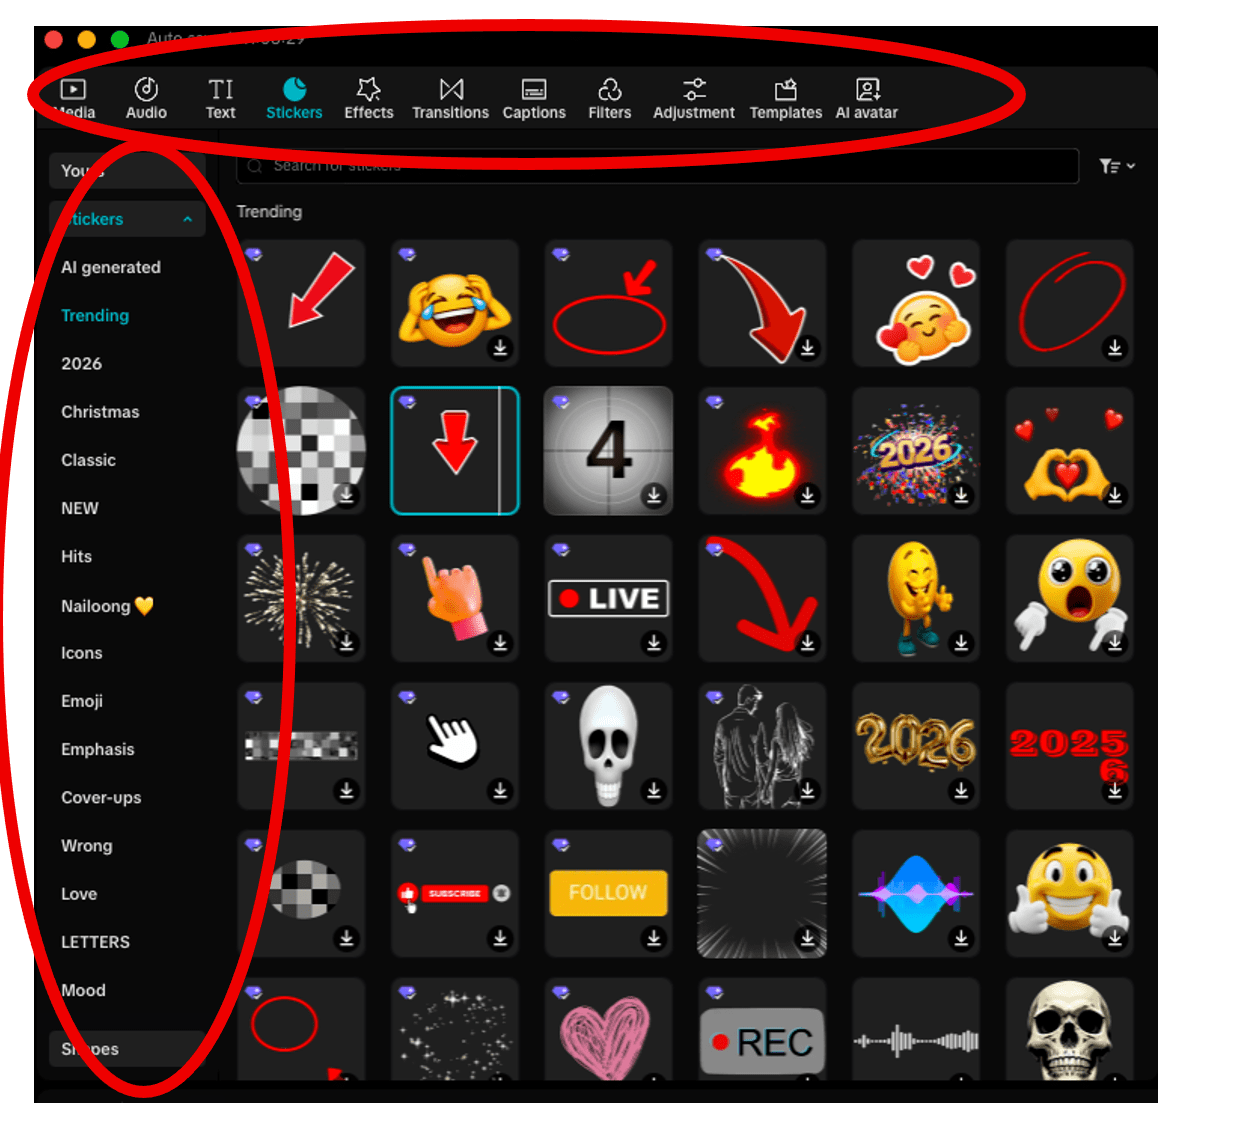
10. More Fun Social Stuff!
In the top LH window are a host of options for “stickers” “effects” “transitions” and “media”. Down the left hand side are an insane number of options for each!
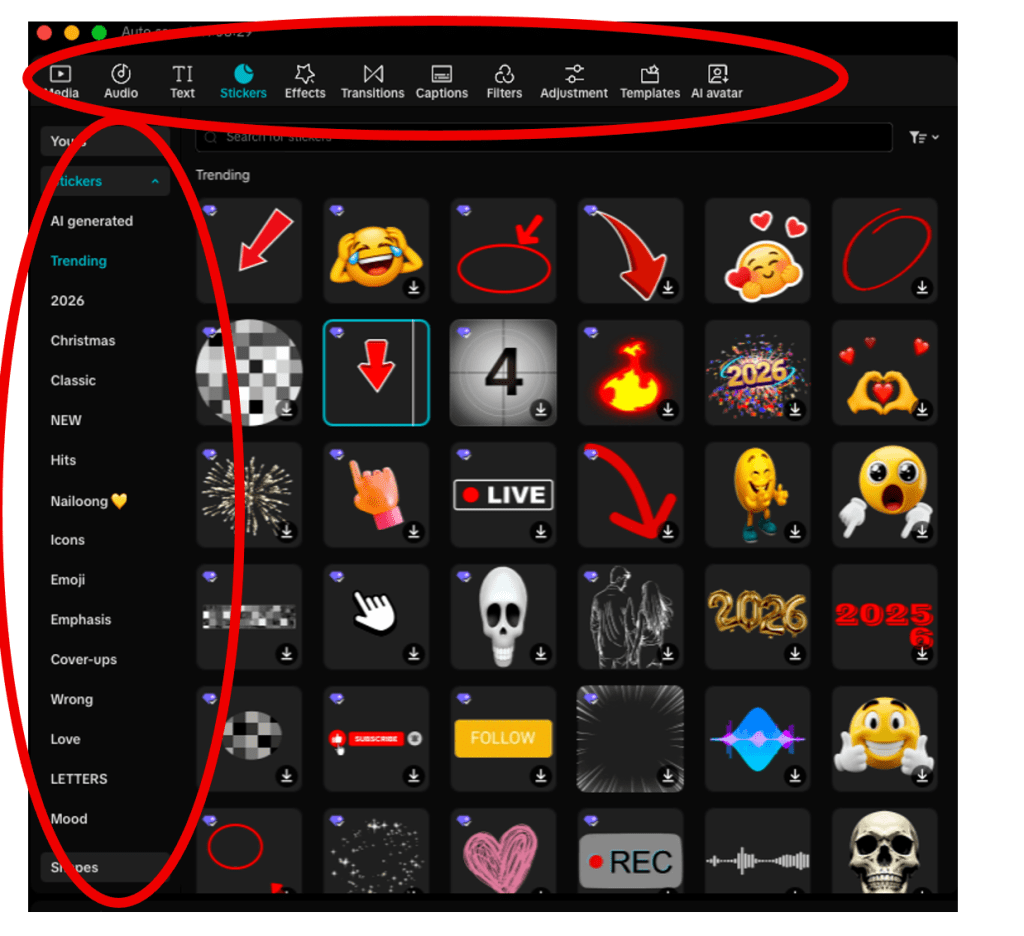
Stickers: Drag the sticker onto the timeline. You can’t edit text but can use the “transform” functions (RH Window) to change size etc. You can also play with “Animation” – making them “bounce in”, for example
Effects: Double click to try out an effect. Drag and drop it onto a piece of media to apply it. (There is an option to delete it in the RH window)
Transitions: Drag and drop onto the join between pieces of video to create flashy transitions.
Filters: Just like Insta filters. Drag and drop onto a piece of media to apply.
Media: Go to “library” in the LH menu to find stock footage, backgrounds etc. Select AI Media to generate images or video (uses credits in Pro).
Audio: Use the LH menu to select stock music, SFX or to generate AI Music.
I hope that was useful. If you have any questions – please post them below or get in touch via the contact page. I’ll do my best to answer.
